So, you’ve just finished installing RollBack Rx or Drive Vaccine on your end user machines. It’s configured just how you want it, you’ve ran your initial tests and the program is working fine. You’re about to settle back in at your desk with a fresh cup of coffee when you realize there’s one final step left before you can call it a day – installing the RMC, the free centralized management tool.
But don’t sigh just yet. Installation and running the RMC is as easy, if not easier, than setting up either RollBack Rx or Drive Vaccine. After reading this quick guide I’m sure you’ll feel confident using this tool.
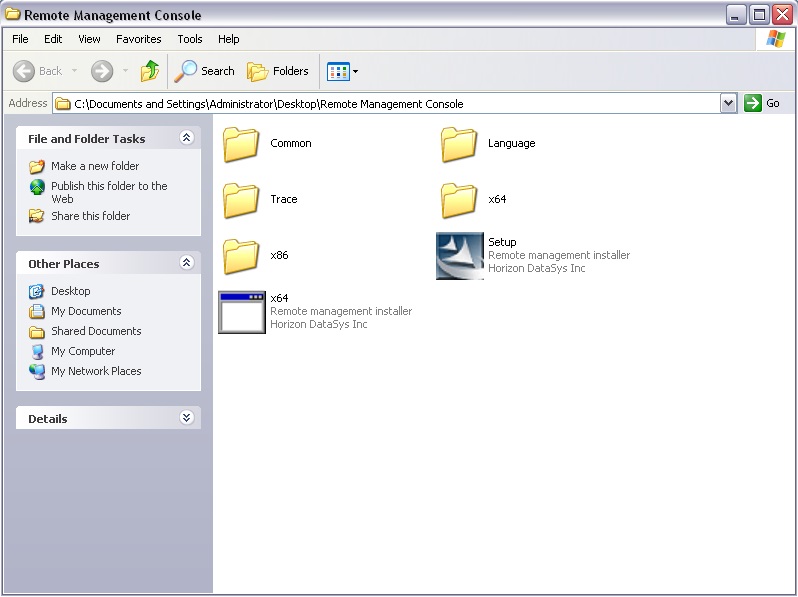
To start with, when you download either of the two programs (or from the CD if you purchased it) the .zip file/CD package will contain a second folder identified as the “(Program Name) Remote Management Console”. Be sure to unzip this folder if you downloaded the program, and then open up the folder.
Inside, you’ll find a few folders, which can be ignored. Simply run the Setup.exe Application, or the x64.exe Application should you be running a 64-bit Windows Operating System and wish to run this specific installer (the Setup.exe default is still recommended, as it will identify the OS itself. This should be reserved for failed installs while running the Setup.exe).
Unlike RollBack Rx or Drive Vaccine, installing the RMC does not require a reboot. So don’t worry about that. Simply follow the on-screen instructions and you should be finished with the installer in just a few seconds.
…Done? Excellent!
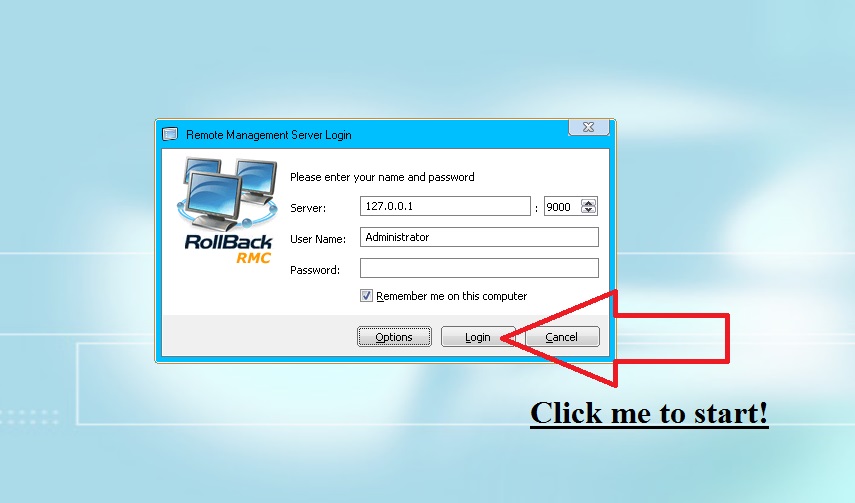
Next up is to run the RMC itself. Open up the program from the newly created desktop icon, and you’ll be greeted with an intro screen requesting a username and password, as well as the server ip and port. By default, this will be set to the local machine ip (127.0.0.1) and Port 9000. If you’re running the RMC from this same computer, these default settings are sufficient. If you are running the server control portion on another PC, please enter that computer’s ip address or machine name to connect through.
Important note – the username and password requested here are not the same as the ones set for the end users. By default, the username is Administrator and the password is left blank. Simply click on Login to enter into the RMC.
Voila! We are in.
As you’ll see the RMC tool is quite simple in its layout. There are default groups located on the left-hand side, with a display (which can be visually changed to suit your preferred style) on the right-hand side highlighting all the connected PCs. Users which are online will be colorful, while users who are offline will appear greyscale.
Now, we can get started.
Getting Started
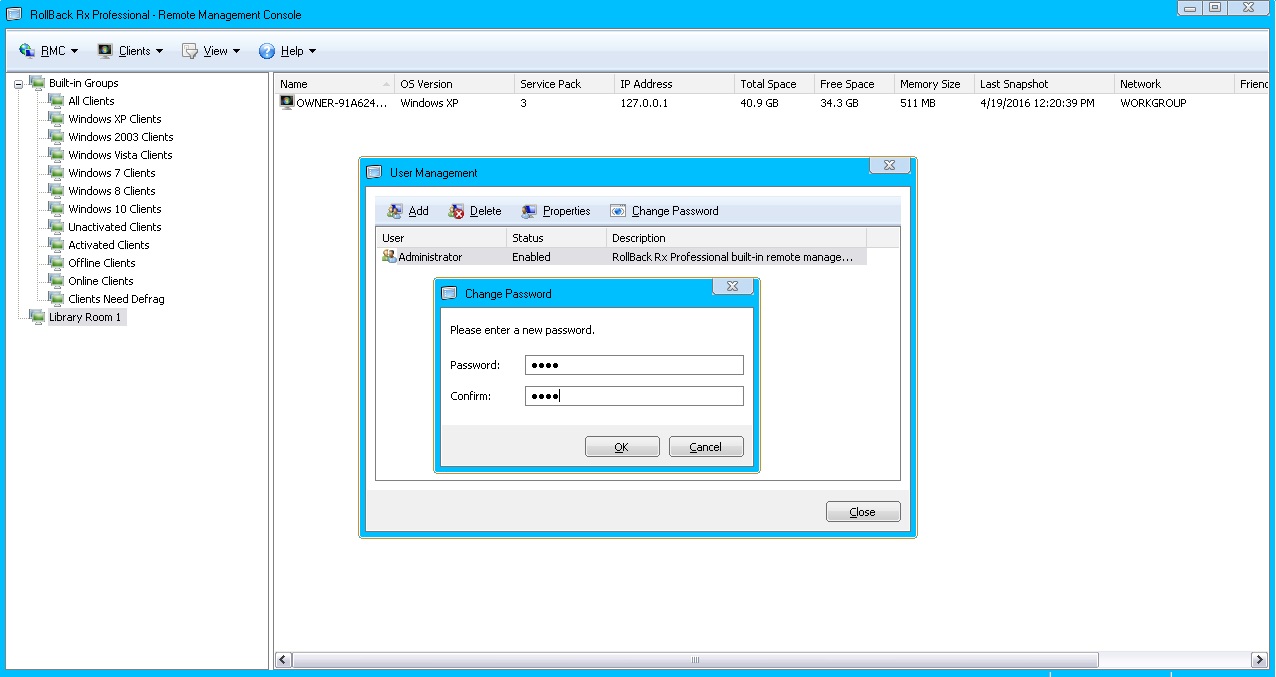
The first thing a network administrator may want to do is set up a username and password for the RMC itself. To do so, click RMC in the top-left corner and select User Management from the drop-down menu. A new window will appear with the current Administrator being listed. If you wish to start creating other Administrators or users with variations in their capabilities, simply click Add and fill out the requested properties.
To change the settings of existing users, highlight the user and select Properties, or select Change Password to update the password. Do remember by default the Administrator has no password, so you may want to update it now to include one.
Now that our users are configured, it’s time to start setting up our workstations. The first thing we should do is place the end users into the appropriate group.
Group Settings
By default, there are several built-in groups divvying up the “Clients”, or end users, by their Windows OS, Activation status, whether or not they are currently online or offline, and a single group containing all clients.
If this configuration floats your boat, then by all means stick to it. If not, creating groups can be accomplished by right-clicking whitespace on the left-hand menu and selecting “Add Group”, or clicking on RMC and selecting “Add Group” from the drop-down menu. Complete this action by giving the group a name, such as “Computer Lab Room 232”, writing in a description and selecting OK.
Adding clients into your group can be done by dragging and dropping the clients into the appropriate group. Removing clients can be done the same way, or by right-clicking the desired PC and selecting “Remove from the Group” in the drop-down menu.
Deleting groups can be done from the RMC menu as well, or by right-clicking on the group and selecting “Delete Group”.
The power of grouping PCs, aside from the aesthetics, is in the precision it gives you, the administrator, the ability to tell full groups of systems in a specified grouping a set of orders, functions and policies.
For example, let’s say we have a group labeled as “Library Room 1” and we want all PCs in this group to run a certain way. In this case, we’ve told all PCs in Library Room 1 to take a new snapshot every weekday at 8:25 a.m., before the library opens. This way we know there’s a safe snapshot to load into from the morning should a problem arise.
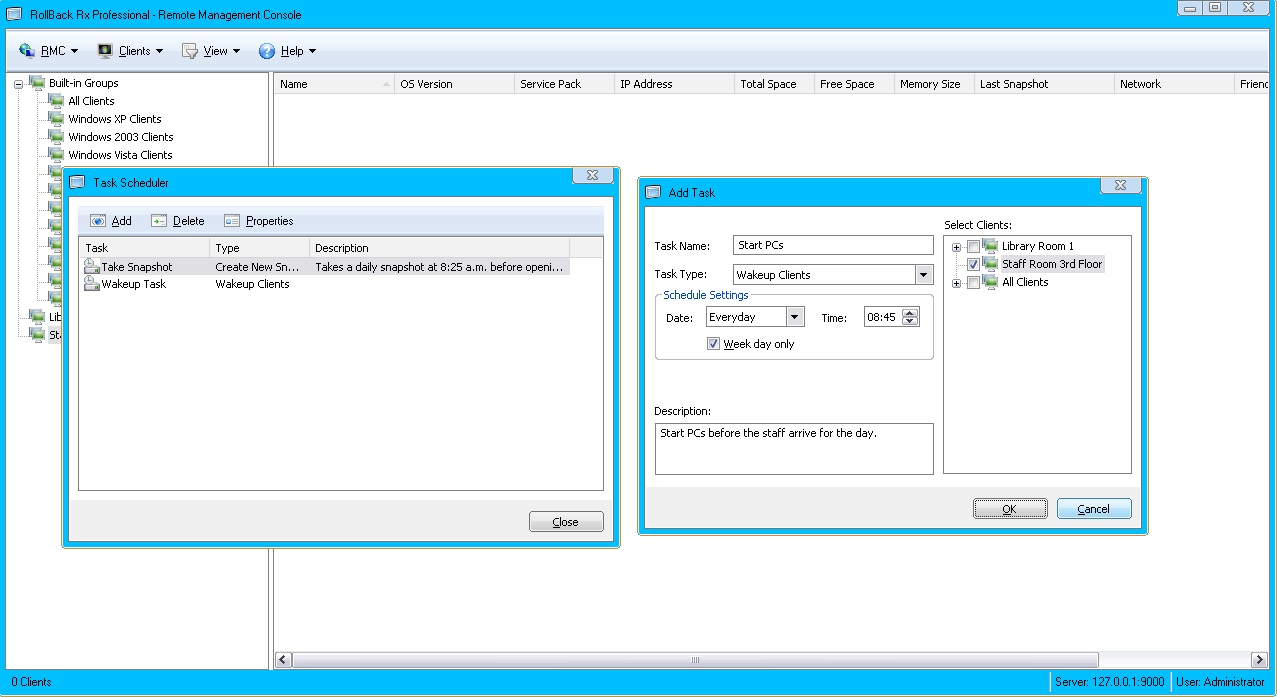
I’ve also placed another task labeled as “Staff Room 3rd Floor” and have given it a task to wake up the PCs (WOL required) every weekday at 8:45 a.m., before the staff arrive. This ensures there’s no downtime waiting for the PCs to startup when staff starts to arrive for work.
Both of these tasks are only issued to the PCs in their specified groups, effectively giving individual groups specific policies for every PC that joins. This tool is very handy.
Taking Control
All right. We’ve got our Administrator permissions set and we’ve got our PCs placed in the appropriate group. What now?
From here on it’s a game of your design. The RMC can be configured to issue out commands to individual PCs by highlighting one, right-clicking, and selecting one of several options available, i.e. taking a new snapshot, rolling back the system, deleting snapshots, defragging, issuing commands, sending files, remoting in (Windows enterprise needed), shutting down, restarting, locking the screen, or completely changing the configuration of RollBack Rx or Drive Vaccine’s settings by selecting “Client Settings” from the menu.
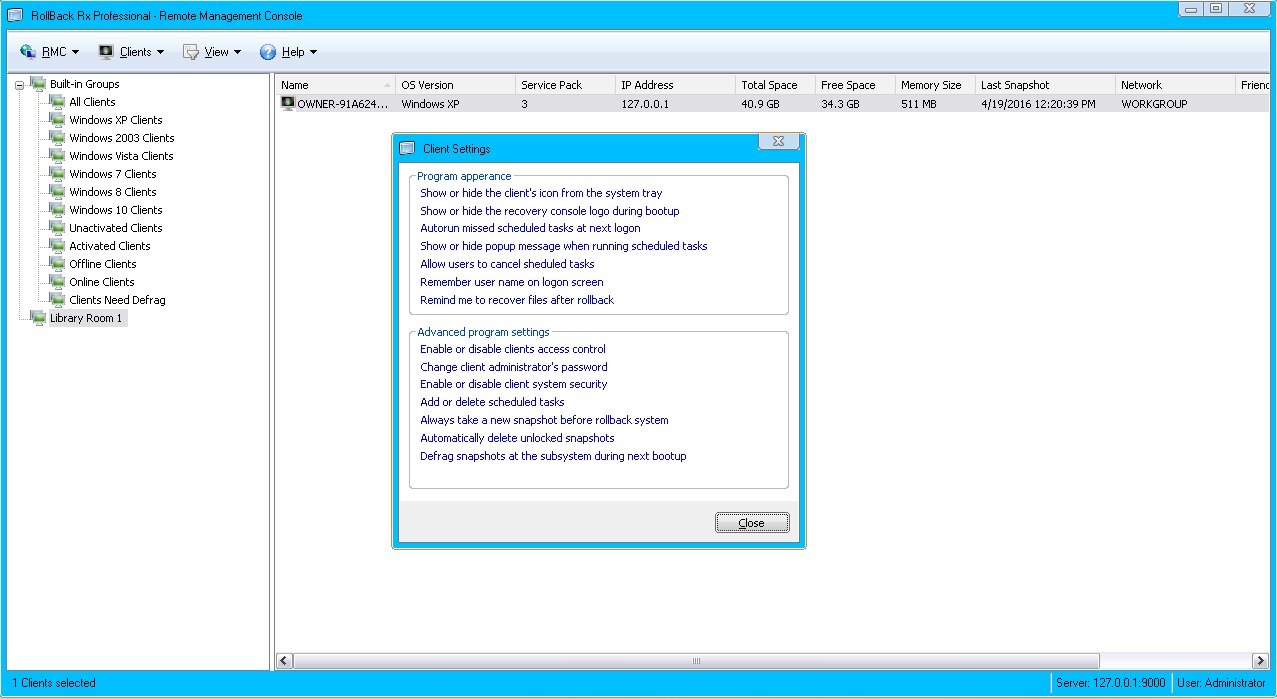
As you can see, the Client Settings menu gives you full control over the function of the program, from its appearance to the end user down to the functioning of the program. This is one of the most useful tools the RMC has, as it allows for quick changes to be issued to connected users on the fly without the need to physically go to each machine. These can be issued individually, to groups, or to all connected machines at the same time.
Staying Informed
By this time the RMC should be up and running with your groups in place and all the configurations set out as you want them. Congratulations!
The last two notes are about staying informed, as the RMC offers two different ways to keep up to speed with 1. The Alert Settings, and 2. The Event Logs.
The Alert Settings can be found by selecting the RMC button and clicking “Alert Settings” from the drop-down menu. Once selected, a new window will appear presenting a few different options for an email to be sent out to the administrator such as if the client has been offline for a certain number of hours, or free space is getting low on the drive.
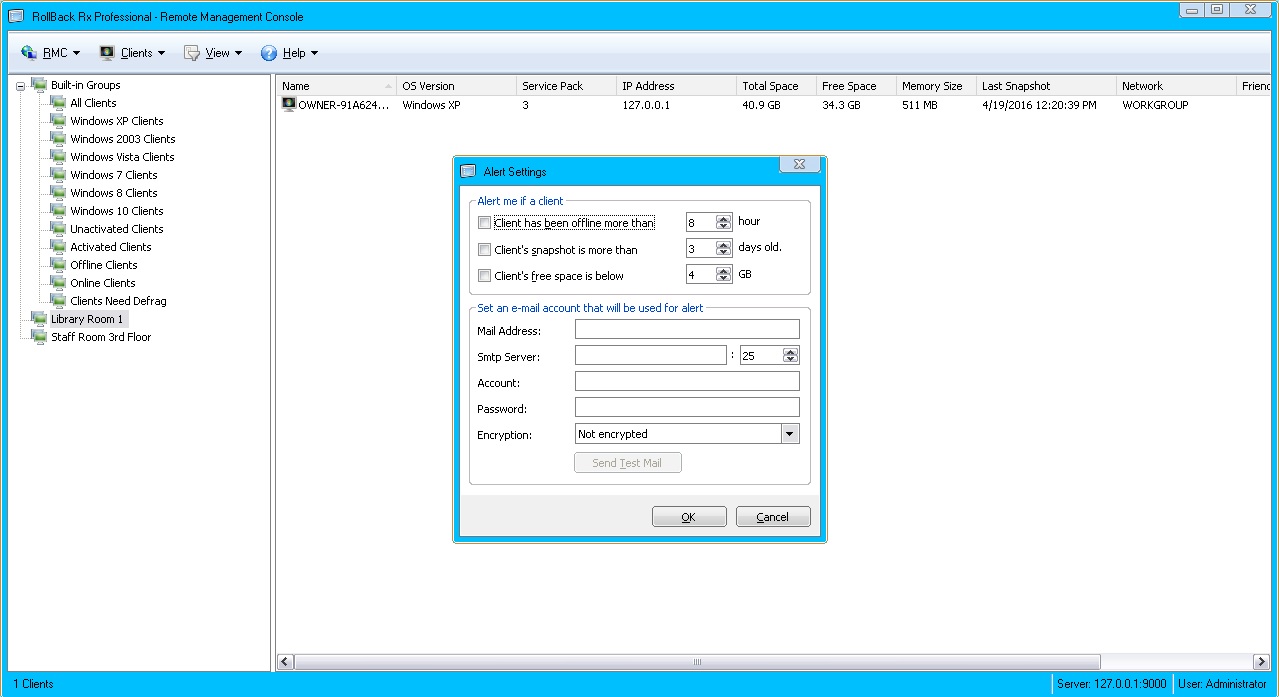
By entering in an active email address the RMC will issue information based on these options, keeping the administrator up to speed on all of the connected clients.
Keeping an eye on the functions of the RMC and its connected PCs can be done through the Event Logs. This information is key when troubleshooting any issues. The logs can be found by selecting the RMC button and clicking “Event Logs” from the drop-down menu.
Selecting “Save As” will export the data into a “.log” file, which can be sent around easily to whoever may need it.
Finally, we come to exporting client information. The RMC allows for users to export all connected client PC information into an XML file. This can be found by selecting the RMC button and clicking on “Export client to XML” from the drop-down menu. From here, the administrator needs to write in a name and choose a save destination, then click Save.
Additional Support
If you’ve come across an issue you still don’t understand after reading through the User Guide as well as this starter guide, then feel free to get in touch with the support team here, or by calling in at 1-800-496-0148.